Leaderboard


Popular Content
Showing content with the highest reputation on 05/31/2013 in all areas
-
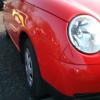
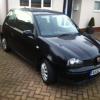
Hi! I have a 2004 Seat Arosa Mk2 in flash red 1.0 MPI She's not very modded at the moment, did have 40mm springs on but they had to come off I have lots of plans though! I dont have any pictures of when I got it, I have pictures from when I put my 40mm springs on at my cousin's in Darlington One nice morning in August I also debadged the rear and sprayed the front grill matt black Some shots at Durham Tees Valley Airport Shot at Newcastle Airport and my cousin Smoked rear windows Back in Blackpool, had a wash! Cleaned my left rear light Before After Debadged rear Nice and clean, bar the wheels :L Now the 40mm springs come off, standard go on Bought some fogs! Now we are up to date Today, I removed the pollen filter and washed it. Then bought a new one! Plans: Interior GTi Rear Speakers ¬ Black Headlining ¬ GTi Grab Handles ¬ GTi Sunvisors ¬ Gloss Black Centre Light ¬ GTi Seats ¬ GTi Red Seatbelts ¬ Flocked Vents & Centre Console (ongoing) Leather Door Cards (ongoing) Sony XAV 601bt Double DIN Headunit ¬ Mutant 4ch Amp & 800W Subwoofer ¬ Genuine VW OEM Mats ¬ Exterior Lower ¬ Colour Coded Front & Rear Bumper (ongoing) BBS RZ 15inch Alloys ¬ Bridgestone Potenzas 165/50/15 (ongoing) Debadged Front & Rear ¬ Smoked Rear Windows ¬ Stubby Aerial ¬ Fog Light Grilles & Fogs ¬ Lupo Rear Lights I will update when I can! Thanks Alex2 points
-
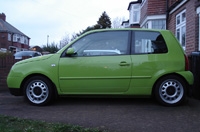
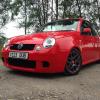
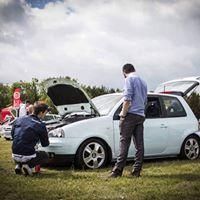
Ok, so the brief was following the release of the MK7 Golf GTI and feature in the new series, budget alternatives, specifically: MK2 Golf GTI, Lupo GTI and MK4 Golf R32. The MK2 was provided by Ray Partner and the Lupo is my daily; nice chap called Mark off the R32 OC in his Mk4. Location was Castle Combe race circuit. It was an all day event, and sadly I cannot post up video for legal reasons - but at least I got to meet Jason Plato!!!! Big thanks to our own mad wax man for detailing my blue Lupo2 points
-
Just done a mini convoy with you this morning! looked cool - sat nice on the road. Are you local? ...First time I've seen you!2 points
-
Some of you may disagree with me on this, but as I was going through the Archive/How To, I realized that we seem to lack basic instructions for fairly fundamental tasks while being overloaded with 'vanity' tutorials so to speak. I'm not saying these are bad, I intend on writing one or two myself when I get chance (we need a proper one for RCL which I will write over the next few days), but it seems strange that we don't have a single tutorial for replacing a headlight bulb on a non-GTI Lupo. This isn't the easiest task in the world for a novice, yet there's not a single description on how to do it. Another one that's missing is how to replace a Brake Light Switch. Why? It's a really simple task, but not if you don't know where to look! I'm not suggesting that the current information isn't useful. I'm just saying perhaps we need to look at compiling more tutorials, on more basic subjects as well as more complicated. I'm expecting a load of abuse here or 30 "why don't you write them then" comments, but like I said, just an observation.1 point
-
Hey guys, Here's Vixen This is a spec list ill update as the thread progresses... Wheels -BBS RM 15x7&7.5 on 165/50 Potenzas Hydro dipped in carbon fibre pattern. Brand new dishes. Brand new stainless bolts. BBS short valves. BBS black and gold 3D badges. Chassis -Full airlift v2 kit supplied and fitted by low standard -Whiteline Rear anti roll bar Audio -Alpine W203RI -Alpine SPR-60c upfront -Alpine SPR-17c in the rear -Alpine KTP-445 inline 4chan amp -Alpine MRP-M650 Monoblock amp -Alpine Type R 12" SWR-1242D -Alpine KCE-400BT Parrot Bluetooth module. -Silent coat deadening installed Exterior -Aero wipers all round -Legal pressed plates with the usual wolfsburg surrounds -A few stickers here and there but not a massive effort -Carbon wrapped Bpillars -Carbon wrapped front badge -Shorter aerial (not stubby though) -Carbon Wrapped Roof Interior -Full set of Lupo GTI seats -Rare Lupo GTI speaker grille rear door cards -Polo GTI Leather steering wheel (black stitching) -Lupo GTI Alu Pedals -Polo 6R gearknob -Custom leather gear gaiter -Bora Glasses holder -Flocked dash vents -Carbon wrapped: Door handles, loads of dash parts, mirror adjuster plates, interior light housing -Fresh Mats -Rightclick alarm and central locking -Lupo S painted mirror adjuster trims Lighting -Phillips Diamond Vision H4 -Single SMD Sidelights with load resistors -LED Number plate lights -LED Side repeaters -Very bright LED interior light -De orange'd front indicators Engine -BMC CDA induction with full piping including all breathers connected to a catch tank -Custom exhaust (cat back, just a small middle silencer) -Audi R8 oil cap1 point
-
Time of year when I start looking for replacement wheels. Running out of BMW options I think (though z4m or a v8 might be fun) tempted by something older and more interesting but it needs to be reliable and used as a daily so approved used warrenty is usually what I go for. Last few cars for those who don't keep up: 3lr Z4 E85 m sport with the sound generator modification and a few other custom bits and enjoyed the sound and handling though the ride was pretty shocking and it needed plenty of things replaced under warranty (wheels, steering rack, rear springs etc.) Mover to an E46 M3 which I loved, but got married and the running costs were getting too high to justify. Best engine and fantastic m-diff, loved the sound, space and handling and always felt special. Down side being the boot floor cracks, bushes and springs lasting 30k miles and service costs in four figures. Changed for a 130i and it has been the best of both, being similar to my old z4 in running costs, not had any reliability issues or warranty work and it is almost as quick as the M3 up to legal road speeds. Doesn't feel as special but easy to drive and doesn't scare the wife like the M3 did. Had E39 M5, E46 325ci and E90 330i in the past too so had enough of 3 series, but not finding much that I like in the current BMW line up. Prefer N/A over turbo, straight 6 or V8 rather than a 4 pot and has to be manual not flappy paddles or auto. Budget is about £18k for trade in but can be a bit flexible. Only do 8k miles a year mixture of business and pleasure in my car and I have a 120d for longer motorway runs. Options are: 1. Keep the 130i but get the bmw performance exhaust and induction kit plus a remap and differential to give 280 bhp and the excitement and sound I miss from the M3. 2. Look for a manual e89 3lr N/A with a manual gearbox. (not that many around and the e89 gets a bit of a slating in most of the reviews I have read though none seem to have tested that specific version). Looks like the dealer 30 miles away has one in approved used so I might go for a test drive. Electric handbrake might rule it out, be nice to be back in a roadster though. 3. Wait for a manual 645/650i or 545/550i to turn up on the AUK site or just go for a z4m. 4. Other?1 point
-
Hello, first post here. I'm thinking about changing my 1.8 astra which currently does circa 35 mpg to a lupo to help save some cash and to also scratch that vw itch but I can't decide which model to go for. Options are: 1. 1.0 - seems to be more out there to choose from 2. 1.4 tdi - most expensive option and pretty scarce. 3. 1.7 sdi - possibly the best option but again scarce, seem cheaper than the tdi. My route to work is a 50 mile round trip, with all other trips I do about 300 a week. I have 3 route options to work all roughly take the same amount of time and are the same distance +/- 4 miles but vary in style. 1. A road all the way, maintain a constant speed - takes the longest 2. 1/2 motorway followed by 1/2 a road - quickest route 3. Country lanes - can be stop start and a bit of rough route. So what is the best lupo for my needs and what I realistically expect to get mpg wise? Ideally I would like a £30 year road tax model, all helps with the cost savings but wouldn't be a deal breaker for the right car. I'm sure there will be more questions soon. Thanks in advance1 point
-
1 point
-
Ok, just popped out to lunch today, and soon as the engine turned over there was, what I can only describe, as a clicking noise akin to sticking a lollypop stick in a bike wheel if you know what I mean. I had the the PAS pump and aux belt replaced a couple of weeks back, as the PAS pump was shot, I had to fix the pipe going into the pump with a jubilee clip as the garage had just reused the old knackered hose clamp that was allowing the PAS fluid to still leak out, but apart from that it's fine. I only say this as the noise seems to be coming from that area, and the noise fluctuates from it's constant click when putting on full lock. The previous pump on it's way out made a whiny noise, so i'm hoping it's not that again, aux belt slipping? alternator? I'm at a loss until I get back home tonight (if it makes it that far) and can have a better look.1 point
-
A scrappy that's breaking a lupo would probably be your best shout1 point
-
we waved!! haha1 point
-
Forged internals are never 'CHEEP'1 point
-
Dblock: Yeah, those are what i got when i did the audio in the passat, got the 18mm ones, and they went in fine. I did get the same for the lupo, but never got around to fitting them.1 point
-
when I put my foot down in my auto it sounds like a bag of spanners so count yourself lucky lol1 point
-
Hi all, I have got a little dink on my passenger side front wing. I would love to knock it out but I cant get to it through any of the small holes. Would drilling a smallish hole from inside the engine bay just big enough for a tool to get to it be a bad idea? I have tired a dent pulling device but it didn't seem to work, I will have another go now its warmed up a bit but its a real eye sore! Any help, cheers1 point
-
Age isn't an excuse for bad taste1 point
-
Just picked up my new car which had previously had Cambridge edition rear lights, these were switched back to standard Arosa Mk2 lights for the sale, all the fuses were blown so i replaced them and they blew all over again. Different wiring. While rectifying the problem i found a load of spliced wires and it occurred to me that not many people know how to correctly swap connections in terminals so i decided to write up this little how to. Here goes: This is the spliced loom how i got it (bar pin 6 which i fixed before thinking about making a how to). If this mod was done the 'correct' way, it would be a lot quicker to revert and a lot neater. Step 1: Insert a small screwdriver or something similar to pry each end of the retainer. This block is for the rear lights, the retainer on the connector block for the radio will be a slider that pulls out the center of the block. NOTE: MOST BLOCKS CONTAIN RETAINERS. INSPECT THE BLOCK THOROUGHLY BEFORE ATTEMPTING ANY EXTRACTION. This will be what it looks like open: Step 2: Insert something into the connector block from the front on either side of the pin to compress the tabs, you should feel/hear a small click or pop, this indicates the pin should be free. For this i used a staple from an electric stapler/nail gun. Not the greatest picture but you can just see on pin 5 (red and black) the staple pushing down on the tabs. Step 3: Extract the pins and swap around. Its that easy. A picture of the loom tidied up - all wires heat shrank up, then bound with insulating tape for water proofing and bound again with loom tape for strength.1 point
-
Coming home, saw two lupos, one behind tother. One black + blacked out windows Blue one, tailgate happy1 point
-
Yup. This explains it all reasonably well http://www.alloyguide.com/pcd.php Just ignore the bit where it says you can only go 5-7mm off standard for your offset. Much bigger differences can be obtained with careful tyre choice, arch work etc1 point
-
Hi there please help i asked admiral this question and they said its from the second date and then i recieved an email from DVLA to say that its the first date.. basically when doign any quote for car insurance they ask if you ahve a full uk licence and how long you ahve held that liscence... Well i did my motorcycle test and passed in january 2012, so in my eyes thats when my liscence was updated to a full liscence. Then in 2013 in january i did my car test and then my liscence was sent off and updated?.. well the only obtions they give you when doing insurance qutoes is uk full or uk provision and how long you held it.. Well in my eyes Ive had a uk full liscence since january 2012 as thats when My liscence went pink and i would class my paper liscence as a full licence. So if any1 knows about this please help a the different in insurance between saying ive had a liscence for over a year and for 4 moths is almost doubled.. so dvla send a message saying its from the first date so i assume its from the motorcycle date but Admiral said different :S Please help thank you1 point
-
Y reg silver/arctic grey arosa by morrisons in leek, flashed and waved, you saw me and looked at me as if I needed help, I was just being friendly1 point
-
It's not a joke, it's history.1 point
-
A good toolkit is required, ideally a breakers bar, lots of sockets of varied sizes, ratchets and allen heads for them, also hex and star allen keys, decent jack or two, good set of varied screwdrivers, spring compressors and a Hammer is always useful too! This guide is a guide and not fact, anyone who wishes to make alterations or add tips can feel free! Start with one high lupo (courtesey of Newnsie!) starting at the back, u can either pull back the carpet (not much room) or pull off the rear doorcards and undo the clips of the seatbelt surround. (some are tucked behind the lip of the boot) seatbelt cover pulled up out the way start to grip the top of the mount with pliers or similar. and use a spanner to undo the bolt off the top of the thread can be very stiff! when completely undone at the top, undo the bottom of the strut and remove. use a screwdriver under the spring to plier it out of its cup. reassembel the replacement strut, (minus the little ring on top in the pic, we couldnt fathom this, assumed it was for the people running without bump stops, some coilover sets like my AP's never had these little rings, so we left them to one side. just repeat the process to get it back in, and do up the top tight as it will go, but dont overtighten, cos the top snapped off on these, so we hope they never have to be removed! best do the lower bolt after the spring is in. whoops - too tight! With the little gold plate on the bottom of your spring base, bolt it up through the bottom of the cup and fix tightly. place the new spring in (with the little rubber damper bit on top from the previous spring) and when bolting the strut at the bottom, ensure the spring is seated properly on its top bobble. repeat for the other side. On to the fronts. off with the cap: with an (ideally swan neck) spanner hold the bolt, then with the ratchet and allen attachment undo the strut (again can be stiff). when undone, keep everything in the order it came out as they go back on that way. u can reuse the bolts on the new dampers as they probably go on a lot easier! wheel off looking at the next bit spanner and breakers bar to start on the two bolts holding the front shocks to the wheel hub. then switch breakers bar to a more usable ratchet to finish. (may be stiff) use the trusty hammer to tap out the bolts after the nut is removed. bolts out and undone, remove the shock. (some models have brake lines fixed to strut, unclip these and cable tie loosely out the way) spring compressors to give a bit of a hand getting the top bolt off. (alternatively buy the top mounts and nuts from vw cos it will save hassle.) use a swan neck spanner to reach in around the lip of the rubber along with allen key ratchet (warning - this bolt is extremely stiff and hard to undo!!!) successfully removed/replaced with little dome thing still tucked underneath place on top of new shiny coilovers and bolt down, replace the strut again, as before reassemble the top as before, done up tightly. loosely fit ower bolts, pull disc towards u at the top (best camber until u can get the tracking done) then tighten the bolts very tight (breakers bar again). grease everything thouroughly! repeat other side and pop the wheels back on! lowered lupo! just have to let insurance know and get the car tracked to avoid unnecessary tyre wear. this guide should cover most things, the rest is common sense for an averagely practical person (which u would have to be to want to fit the coils yourself), make sure your coils are set at the same heights and things are done up tight. use the pics to guage how low u want the car on the coils. (the rears are right down, adjusters in). we take no responsibilty if things break! Credits go to Tom, Karl, Myself and Jake (who sadly couldnt be with us for fitting as he had exams to revise for but kindly lent us his spring compressors) and Jowey who happened to have given Tom a few doorcard clips which came in handy!1 point
-
I've just purchased a 1.4E 16V Lupo today, Does anyone know what best insurance quotes are for someone who's 17 & just passed their test as I am getting insurance quotes around £3000!1 point
-
1 point
-
i think we need something cool than the normal design we do! no offence to anyone! but its straight up boring! wheel whore, broke status etc etc etc, have cool designs, club lupo has... dont get me wrong, i love simplicity, but for 2009 i dont think its good enough! no i know there are looads of people who are awesome on the olde photo shop! so get to it! i will start things off! haha i have some from 2006 that i will post, a little politically incorrect but hey! hahahaha. so lets see em!1 point
-
Pm'd1 point