Leaderboard


Popular Content
Showing content with the highest reputation since 07/03/2024 in Posts
-
5 points
-
Hey all! I bought my 1st Lupo today. Introducing.. Otis! (inspired by the reg haha!) Otis is a bone stock 1.4 petrol "e" model. So, wind down windows and no AC, but still all the fun you could ask for. Where this one shines amongst the others is its mileage. 16.4k. Thats right! 16,400 miles.. don't believe me? Check the MOT history, and all the evidence is right there Glad to be here! -Adam.3 points
-
I made this thing 🤷♂️3 points
-
That's ok, it means the earth connections are ok This is not ok. Do the following steps: - check fuse no. 37 - if fuse 37 is ok check the continuity between pin 2 and one of the ends of the fuse (if you can see where the black/white wire is, if you can't see the color of the wires then there should be continuity between pin 2 and one of the ends of the fuse. If there is no continuity, you must check if there is continuity between pin 2 and pin 4 of the red 10-pin connector under the relay support. If there is continuity here, you must check if there is continuity between this pin 4 and the fuse. - if there is continuity between pin 2 and fuse 37, you must check if there is continuity between the other end of fuse 37 and pin 87 of relay 109 Check up to here and then we'll see further Attach a needle to the multimeter probe3 points
-
Thanks a lot, I'll check with the garage on Tuesday. Proud to be a part of it! Of course! Keeping mine original as you can seeq♥️3 points
-
Just closing this thread in case it helps someone in the future. My issue was Relay 109—I bought a new one from VW for 39 euros in Belgium (including taxes). To note, the injection pump at the front of the engine is practically "bulletproof," so if your car used to run great, the problem is most likely electrical. Check the replies above for guidance on diagnosing your issue. Special thanks to everyone who has helped me from the start of my journey with my SDI!3 points
-
I like the challenge, want steels, looks the style, made to fit, stronger than alloy…….. what more can I say?3 points
-
I think you mean the other way round. E5 has 5% ethanol, E10 10%. E5 is always better than E10. Nothing wrong with the stuff if it's used fresh, but as it ages it absorbs water and then the ethanol (alcohol) oxidises. Oxidised alcohol is..... vinegar (also known as acetic acid), which corrodes loads of stuff. But in any 2-stroke carbureted engine, only use E5, because as the alcohol vapourises near the jets, moisture condenses out in the throat. And those droplets make cold starting really difficult.3 points
-
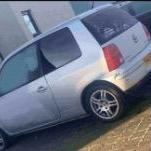
I made the long trip from Stonehaven (near Aberdeen) to Nottingham to pick up this wee gem. 52k Miles, 1 owner from new, 23 services and all original panels, windows and lights. I'm a part time trader and bought it through the business as a 'potential' long term asset/project and I haven't had to add another owner onto it. As you will see from some of the pics it's in need of some tlc but that is more than reflected in the price I got it for (IMO) anyway. Underneath is not to bad and I would imagine I will get what I can blasted and powder coated. The exhaust is ok but seen better days - I'd love to get my hands on a new one! An old gentleman had it and I don't think the interior has been cleaned since it was new. It's very grimey but I think will potentially clean up like new as it's kinda been protected being that way. I might need a new steering wheel and door handles etc. On the bodywork - it solid apart from a few areas. The decision is whether I get said areas seen to and try and keep some original paint work or go full respray. I am not concerned about the cost of the respray more losing the originality. However, the respray is the only way I'm going to get it 'mint' if I want to go that way. I've never entered cars into shows etc before but I'm getting a bit older now (nearly 44) and quite like the idea of it. Locally I can enter cars before 2005 and none of my others are there yet. I also have the 3 big V8's in my collection (last of the normally aspirated) from the noughties - Merc Amg W204 C63,Audi B7 RS4, BMW E92 M3 and an Mondeo Ford ST220. So, I've always wanted to add a wee pocket rocket to the collection and I'm looking forward to the project., it's a hoot to drive. Id welcome any thoughts or suggestions on said project. That aside , hello to fellow forum member 👋3 points
-
Nothing wrong with a bit of car on fire now and again.3 points
-
Haha! @sj2112 still got it ☺️ Acquired a new reg plate last year!3 points
-
2 points
-
Have you tried putting a jump pack/trickle charger on the battery?2 points
-
No, under no circumstances should you remove the headlight. Behind the headlight there is a black cover (item 3 in the picture below). Remove this cover (it is held in place by a clamp, and at the bottom it has two guides, when installing you first fix these guides in place) Then proceed as described in the picture below2 points
-
It is the wire that goes from pin 87 of relay 109 to pins 1 and 2 of the ECU connector. The measurements I described above will show if the problem is in this area. I'm attaching the wiring diagram just in case. AKU flow diagram.pdf You need a screwdriver bent at 90 degrees and the airbag is removed quite easily.2 points
-
After removing the connectors from the ECU, proceed as follows (as a precaution when removing/inserting the connectors, remove the negative battery terminal): - clean the contacts with contact spray (use a dedicated spray, nothing else) - identify the pin numbering in the connector. At the moment I don't have a numbering diagram, I hope the pins are numbered right on the connector. - reconnect the negative battery terminal - with a multimeter, check the resistance between the negative battery terminal and pins 4 and 5 of the ECU connector. It should be very low, around 1 ohm - check with a multimeter the voltage between the negative battery terminal and pin 37 of the ECU connector. It should be equal to the battery voltage.It is a permanent voltage regardless of whether the ignition is on or off. - turn on the ignition and check with a multimeter the voltage between the negative battery terminal and pin 1 and 2 of the ECU connector. It should be equal to the battery voltage. Depending on the results of these checks, we can isolate the area where the interruption could be.2 points
-
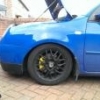
It's certainly 'spring'-time now Otis now has AP Lowering Springs on him, making him 35mm lower than standard. My aftermarket exhaust was also meant to be done today, but it seems I had a lapse of judgment in measuring, because I need a 5mm adapter to get it to fit! Hopefully I can get that sorted soon. Anywho, see below for a before and after!2 points
-
Fuel? As in not enough. Can you read live data while driving? Look at the O2 numbers. Else it also sounds like cam belt may have jumped a tooth. Cutting out is often crank sensor.2 points
-
Photos re-hosted2 points
-
You can remove the engine under tray and wing liners to check everything. You can see from below the car. You don't need to remove the wings and bonnet. I would check inside the sills for corrosion. You need to remove the rubber bungs to have a look. If necessary, you can spray more wax inside when it is dry. 👍🏻2 points
-
Can't help with your questions but a warm welcome and that's a good looking Lupo.2 points
-
Ina lifters. Soak for as long as possible. Male sure all is sealed nicely and that oil drains back to the sump without any goo in the drain holes. Clean oil channels as much as possible. You know it all leads to doing the belt and water pump as well since it's kinda off.2 points
-
There is a member on here who has a Gti with less than 3000 miles from new. There was another Japan import Gti that when it came to the country it had 3000 miles (checked the MOT history and that is now on 32000 miles WO04 ZHA) I did try and buy a sport about 10 years ago that had similar mileage to your car but unfortunately it had been agreed to sell to a family member.2 points
-
Just the switch, no need to remove battery2 points
-
If it's not too late. See to it that you have prepared a funnel inserted into a hose to collect the antifreeze2 points
-
Such useful info, moved into How-to section 👍🏻2 points
-
Happy New Year to you too! Every Japanese imported GTI I've ever seen has AC! So I'm guessing that it's standard fit, seeing as Japan is classed as sub-tropical.2 points
-
Had the car for over a year now, loved every bit of it. Only just got the radio as wanted something more original than what I had in it before and didn’t know if the codes from eBay were genuine or scam2 points
-
2 points
-
There is an adjustment procedure, but I don't know where you'll find that "3192 Gear stick jig". I've never seen one myself. Below you have the adjustment procedure and a simplified diagram of the selector mechanism where you can see what is done for the left-right and forward-backward movement Adjusting gear change mechanism.pdf2 points
-
A question for the experts out there. Just been looking for a couple of new front subframes to keep as spares and noticed that there are quite a few on Ebay. Brand new. Part number 6X0199315F. Cheap too- £90 delivered. "Tried" to ask a few questions from the various sellers- who don't speak good english which got me investigating, as they claim to be in the UK. Then on companies house site they turned up as registered in China...! So this got me thinking- Are vdub making some sort chinese only model car based on the 6N Polo or our 6X Lupo (Arosa) that isn't available over here? I know our cars use a lot of (new) older model components from the mk2, Derby, Polo and even the old air cooled beetle- all just "re-partnumbered". There might be even more brand new parts to keep our cars going for much longer? (They still make the 1.7SDI engine for use in big site generators and marine engines. Not that I'll ever get close to the known worn out at 500k miles or 15,000 hours.)2 points
-
update time! seatbelt pads, a toy lupo (hard to find!), otis sticker and floor mats!2 points
-
I decided to be there from monday to thursday, thinking it was going to be less busy, but it was busy anyway, being only two and a half hours open a day. Next year I will try to be on weekend too. I went to Brunchen in the morning too see some trackday action. The inclination changes of the track were really impressive on live. After lunch and studying the racing line a bit, was time to do the first lap. It was a big WOW. Was like a rollercoster more than a circuit. I didn't know in what corner I was, or which gear. Too much adrenaline... I went to the parking to calm down a little, check tyre pressures, and went for another. My reference time lap was from this 60hp seat mii video (11:15 btg), and I ended the day with a reasonable 11:50 on my second lap. Tyres definetly went hotter than ever before, and catch some rubber from the track. I was really surprised on how well the car performed, I didn't feel the suspension wasn't good enough. But something I didn't want to repeat was to overdrive like I did on some corner entries, trying to not block faster cars. I cooked the brakes and tyres needlessly.2 points
-
@amgeriz Thank you so much! Yeah, we took the heat gun to it (was bent outwards beforehand) and its the best we could get it. We also used said heat gun to expand the screenwash tubes, so that an oversized bit of tube would fit inside! It's lovely and snug now its proper cold again2 points
-
@tigcraft Yep, 100% agree mate. We've cleaned the seats now as it was indeed covered in grime. The overall condition when taken mileage into account is poor. However, we cannot find anything which disproves the mileage, so we've concluded its just had a very hard life! (Perhaps it was used as a runaround at a garage, and the stains around the steering wheel and stalks is dried oil?) Who knows, but yes, you do make a good point. Not the best for the interior haha! The good thing is he's a solid little runner2 points
-
Now that’s a very interesting theory and good read.2 points
-
With all important issues fixed, and a fresh set of maxxis tyres, it was time for some lowering. I wanted something cheap but with some good reviews, so I ended with a set of JOM coilovers. Bought new top mounts and bearings, and used the non retaining nut that come with the kit, so it's way easier to replace the top mounts in the future like you see. Out with the old In with the new. Didn't use the plastic washers (because less travel) and dust covers (because it desintegrates quickly) and cutted a new set of rear bump stops to the measure of the new fronts. Next time I will use powerflex top mounts, because rubber ones sag, letting the upper support loose, not ideal. The change was great to my taste, little bit bouncy, but the car feels alive. There is something important in non abs equipped cars, because they have a brake bias valve on the rear beam. When you load (or lower) the car, it tensions a spring that moves the valve, increasing stopping power on the back. I realized it because brake pedal become spongy, like it's not enough bite on the front. The only thing needed is to release tension on the spring. I measured first and then moved up the bolt on the slider. In my case 4mm was enough to recover front bite.2 points
-
If you put some pictures up in detail we possibly can give you answers2 points
-
So, i have not updated this in a while. I did not think i get more information. But there is a few more cars to add Y182LJO Y183LJO The major updates is L6UPO (Red GTi) has been traced. I can confirm this is still in existence, but on a private plate. Thread being updated in due course. X907 NJO i can confirm is in Ireland. Its on Irish plates now. Both Yellow sports on L5UPO have now been corrected, they are two separate cars.2 points
-
Managed to get a genuine lh panel, 6X0803225A, for £45 from Latvia.2 points
-
Yes. 100%. And there will be electrical problems in the future now.2 points
-
Checking my records and a few other sources. I believe VK53 EYY is on a private plate. Total which came to this country was 34. The two 05 ones do not have Sunroof but do have leather.2 points
-
Hi, Just wanted to point anyone interested in buying a GTI to my auction on Collecting Cars. https://collectingcars.com/for-sale/2001-volkswagen-lupo-gti-1 I am the second owner, 2001, 71k miles, 6-speed, Leather and Aircon, Great service history, Full respray last year due to lacquer peel.2 points
-
Will follow with interest. Nice find2 points
-
Could be the bearing, mine can be a bit noisy also but has been that way for years. So chances are yours will bee the same. Thrust bearings tend to get so loud you’d need to change for your own sanity before it a tually fails. Great work there compiling it all into one thread. I really hope this helps more owners. With my plate I used 5mm steel so no flex,at all. But that said you could probably do it with thiner then add a bigger piece over the top spot welded to the first piece, which could bridge the recess the first plate sits in. That way the load would be spread even more over the substantially stronger bulkhead. Using that method I cant see it failing before the car is no longer road useable or they just out right ban petrol cars from the road. Looking at other manufacturers who used similar gear box set ups a d in some cases actual VW gearboxes none I have checked used VW’s Polo/Lupo method add used a bulkhead brace or thick plate bolted to the bulkhead. What I-see here is VAG dropped the ball and then just pretended it was ok.2 points
-
I thought I'd post an update here, for two reasons - one simply to share the update, but, secondly, to signpost and link directly to earlier posts in this thread so that people coming to this from Google etc are able to get to the relevant parts quickly and make informed decisions. Firstly, things have moved on a fair bit since earlier posts in this thread. It's basically impossible to get a new VW pedal box, at least quickly, anyway. Maybe they're still out there, but every VW parts dealer we rang in central London couldn't get hold of one. There are, of course, grifters on eBay selling them for £250-300. This means the options left for most people in a situation where it's snapped out on the road, and they've been recovered to a garage, are: (a) welding or bolting the clutch cable bracing ear back on, ideally with a reinforcing plate to give it a better chance, because even the new pedal boxes are described earlier in this thread, by @bIg F here in 2023, as being still very weak - this requires removing the pedal box, which itself requires removing the steering column, a difficult task that is much discussed in several earlier posts in this thread. Potentially 4-5 hours work (i.e., expensive - in southeast UK, possibly £500+) for a mechanic who hasn't done it before; or (b) using the stronger metal of the car's bulkhead to brace the plastic/rubber grommet that carries the clutch cable to the clutch pedal, as also described earlier in this thread, first by @robertiles here in 2012, then again by @Slammedrollerskate here in 2021, and illustrated with photos and a specifically-cut bit of metal by @bIg F here in 2023. Essentially it requires finding a piece of metal big enough to cover and brace against the hole in the bulkhead and with a hole in its centre just big enough to allow the pedal-side part of the plastic grommet to pass through. I will add some photos below to make understanding this and showing this to a mechanic quick and easy. Although (b) was described by @robertiles back in 2012 as 'not as good as a new pedal box', this doesn't necessarily seem to be the case, with a bunch of people sure that it is perhaps even stronger. I was on the verge of going through with the weld. Garage was thinking the clutch would have been worn and wanted to replace that too (which @elajf1 warned would be what garages would tell people, in the thread's first post), of course about £450. So I was looking at £800-1,000 all-in to get the car back on the road. What swung me was seeing this video on YouTube, and this one, both showing the bulkhead-brace fix - i.e., option (b) above. It makes it very obvious to even a non-technical person what the fix is doing, and how easy it is. It shouldn't take a mechanic more than 30-40 minutes, and requires basically no disassembly beyond taking off the engine splash shield (the plastic 'lid') to make access easier. Finding an appropriate piece of metal could take a little while, but there will be something lying about - the key thing is it doesn't want to be much thicker than about 5mm - as there's not enough slack in the clutch cable to be able to accommodate anything thicker. Here are some photos to help: (1) The hole in the bulkhead in question is located just below here, marked with a red circle. Removing the engine's plastic splash cover makes it easier to access. (2) Here's the hole, closer up and visible, circled in red. In the green square is the plastic grommet for the clutch cable that needs to be braced (and that was formerly braced by the now-broken pedal box 'ear'). What's needed is a piece of metal that can brace this grommet against the bulkhead, while allowing the cable to pass through the hole in the bulkhead. (3) This is the idea - any old piece of metal can do (for the time being, at least). Here's my fix with the piece in place. It can be glued to hold and prevent water ingress between the two metal parts and to hold it there while the cable is reattached, but it will also hold itself from the pressure of the clutch cable once it's taut. The pedal end of the cable can now be connected to the pedal. (4) The final thing is to obtain a little bit more slack in the clutch cable - because it's now routed in such a way that it travels a slightly longer distance, the cable as it is won't have enough slack to be able to be connected properly at the engine end. @bIg F above suggests filing down the piece circled in red below. See that post for good description of that. But there are a few ways of getting the slack, including a fair bit just from the freeplay in the coil (see (5) below). (5) To do that, you'll need to remove the plastic nuts off the engine end of the clutch cable (they would have been where the green squiggles are in the photo). Others have suggested you can also file down a little bit the plastic part here, too (red arrow). But bringing the coil in a little bit also gives some slack (blue arrow). And that's it, really. It's good to drive, probably for the life of the car. My clutch now feels brilliant. Bite point is right up high, no crunching into reverse, no stiffness into any gear. --- I posted the above to hopefully save some people some £ and stress. I have some questions though: (i) My sense is that, ideally, the brace plate should be as large as possible, within the limits of the moulded bulkhead panel, to distribute the stress as widely as possible. Current piece of metal is only just wider than the bulkhead hole itself. Should I worry about this, and re-fit a new plate now the car drives and time is less precious? (ii) How does what this mechanic has done at the engine/coil end of the cable look? The second nut wouldn't go on any further. Should I try to tidy this up, too? (iii) I get a little bit of light grating sound from the clutch when I depress the clutch now. Is this just the throwout bearing giving notice that it'll be on its way out soon or is this something induced by the fix? Cheers to all, glad to have this forum.2 points
-
Finally repaired my central locking issue, I had a broken wire in the driver's door and to who ever owned my car before decided to chop every ground wire going but I've repaired them all to the best of my ability and have covered it all in conduit. As for the CCM under the dash, what a laugh it is getting that out. Luckily you don't have to remove as much as most people say. Just pop the corner of the driver's side dashboard and get your hands under the area and it comes out, not sure if it suppose to have screws as mine didn't, but after i got it free and opened it up everything looked fine and nothing out of the ordinary. If anyone needs help with the same issue feel free to message me for help. Shout out to @Rgillett for the help with all the wires and getting it all tidy. A females touch is always welcome 😁2 points
-
Decided first to take off whats broken and then make decisions, newest update: its not that bad and will be doing a bigger job at once: fixing the rust over the window cince its cracked anyway and making the manual transition. Am marking all the connectors before I forget what goes where. since i have two weeks of vacation at the start of august i should have plenty of time for all this2 points
-
Hi! My names matt, I’ve just picked up and absolute gem of a mk2 arosa. Been searching high and low for a rust free lupo within my budget and not a million miles away and was unsuccessful so I turned my searches to arosa’s and found a peach. Already sitting on jom coilovers, lupo gti interior and a few other goodies. If anyone has any tips, advice or anything please do let me know! I basically just wanting to talk cars to people who like cars 😂2 points
-
Fitting the stalk The stalk that fits is from a VW Transporter T4 (part number: 7D0 998 527, retains at £65 inc. VAT) The stalk is almost a straight swap, however I found that after fitting mine it fouled the cowelling slightly. When pulling the stalk to flash someone it wasn't returning to its original position, and the headlights were staying on. The bit that catches can be seen here: You can see the slight difference between the CC stalk and the original stalk here: I used a modelling file to re-shape the cowelling and stalk so it doesn't touch any more: Remove the airbag and steering wheel and fit the stalk: http://i4.photobucket.com/albums/y139/troolad/30062008022.jpg Connect up the loom that came with the stalk and run it under the steering column. There is space under the steering column to mount the connector: http://i4.photobucket.com/albums/y139/troolad/30062008023.jpg (note how the wire colours change across the connector) http://i4.photobucket.com/albums/y139/troolad/30062008024.jpg The stalk in place: Connecting the stalk to the custom loom A +12v feed is required for the cruise control to work, ideally this should be ignition switched. I chose to use the ignition switched 12v to the headunit since I have an aftermarket headunit and it was easy to get to. Alternatively, the heated rear screen button could be used. It may be a good idea to add an inline fuse as an extra precaution too. Now you have four wires from the stalk, four wires from the ECU and one 12v feed. The four wires from the stalk correspond with the four wires from the ECU (whatever colours you chose): White --> ECU 46 (for cruise on/off switch) Blue --> ECU 45 (for resume) Red --> ECU 44 (for Set) The +12v feed must be spliced into the fourth connection: Black --> ECU 14 (the +12v feed 'enables' cruise in the ECU and gives 12v to the stalk) Activating with VAG-COM Instructions for this can be found on the VAG-COM website. Also, the stalk comes with a booklet giving the activation code. The trial version of VAG-COM can be used to activate cruise. Basically: You can use VAG-COM to check the operation of the stalk be reading some measuring blocks. Reading measuring block 022 in the engine controller (ECU) whilst operating the stalk functions: 00000X Enable cruise 0000X0 Cruise on/off 000X00 Set 00X000 Resume Measuring block 006 in the engine controller will show 1.0 when the switch is moved to 'ON', indicating cruise is active. If VAG-COM shows correct operation of the stalk then thats it - installation is complete! Enjoy2 points