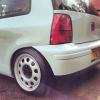
Ben™ Posted March 1, 2011 Report Share Posted March 1, 2011 (edited) Does anybody know if they will fit in the 14" wheel? (i.e. the diameter of the centre cap as a whole.)And ive also read that items like these can still be purchased off your local VW dealer, can anybody confirm this?Cheers all. AdamYes & Yes Edited March 1, 2011 by Ben™ Quote Link to comment Share on other sites More sharing options...
chris c Posted March 1, 2011 Report Share Posted March 1, 2011 look for some p reg caddy ones as they are relatively cheap and easy to get and do fit the 14" wheels if i remember correctly looks sweet tho dude Quote Link to comment Share on other sites More sharing options...
Mike Lupo Posted March 1, 2011 Report Share Posted March 1, 2011 they deffo fit i have them on mine mate Quote Link to comment Share on other sites More sharing options...
JamesTdi Posted March 1, 2011 Report Share Posted March 1, 2011 I'm close to wigan dude, Arosa is looking cool!I was goign to buy a Arosa in this colour from a dealer in preston. But When I test drove it and the breaks failed, I walked away! 1 Quote Link to comment Share on other sites More sharing options...
chris c Posted March 1, 2011 Report Share Posted March 1, 2011 ha ha youd have been crazy not to we should get a club lupo meet going around bury or ashton area Quote Link to comment Share on other sites More sharing options...
Adam R4 Posted March 3, 2011 Author Report Share Posted March 3, 2011 look for some p reg caddy ones as they are relatively cheap and easy to get and do fit the 14" wheels if i remember correctly looks sweet tho dudeCheers. I've noticed some caddy ones here and there. Just waiting for some to come up at the right price! I'm close to wigan dude, Arosa is looking cool!I was goign to buy a Arosa in this colour from a dealer in preston. But When I test drove it and the breaks failed, I walked away!We test drove a Green lupo in Bradford. That was awful, brakes where shocking on that too! I think next im going to look into some -40mm lowering springs to keep me happy until i can afford coilovers.Adam. Quote Link to comment Share on other sites More sharing options...
jabbles21 Posted March 3, 2011 Report Share Posted March 3, 2011 I have Weitec lowering springs, Theyre a 40/40ish kit. Very impressed with them (not that I have anything to compare them with) but give a bit of modest lowering and sharpen up turning and braking.Jake. Quote Link to comment Share on other sites More sharing options...
YvanOn3 Posted March 14, 2011 Report Share Posted March 14, 2011 Very nice ! Adam save some money and install the complete suspension kit. When I installed my suspension kit I will inform about the advantages.In Spain I paid 180€ about 155pounds last week for the complete FK kit ( 35-40mm lowering springs+ sport coilover )Cheers. Quote Link to comment Share on other sites More sharing options...
Adam R4 Posted April 15, 2011 Author Report Share Posted April 15, 2011 Cleaning has been at the top of the to do list recently!Managed to clean atleast 10mm deep of crap out of the rear arches...Cleaned out a damp and hairy spare wheel well.The dog hairs continued through to underneath the back seats, cleaned in there too!Also took the scuttle panel off as i spied some leafs, worse than i expected...still not really clean but it'll do for now.Its had the usual attention of in the door shuts and every nook and cranny i can get into, replaced plenty of disfigured rusty screws aswell!Next up I want some Cambridge rears and a de-badge.Cheers all, Adam. Quote Link to comment Share on other sites More sharing options...
ben16v Posted April 15, 2011 Report Share Posted April 15, 2011 whats the drink holder in the back from mate? car looks lovely best colour Quote Link to comment Share on other sites More sharing options...
12yan Posted April 15, 2011 Report Share Posted April 15, 2011 Nice Work Quote Link to comment Share on other sites More sharing options...
Adam R4 Posted April 15, 2011 Author Report Share Posted April 15, 2011 whats the drink holder in the back from mate? car looks lovely best colourIts actually from a Nissan X-Trail. My dad had one a few years back and he took it out and never put it back, i found it and put it to good use untill i can find some of the under dash ones. Quote Link to comment Share on other sites More sharing options...
onkobonko Posted April 15, 2011 Report Share Posted April 15, 2011 I need some information on the black centre caps like these if anybody could help me out...Does anybody know if they will fit in the 14" wheel? (i.e. the diameter of the centre cap as a whole.)And ive also read that items like these can still be purchased off your local VW dealer, can anybody confirm this?Cheers all. AdamIm 99% certain that you can also get the same caps but with Seat centre badges, they were fitted to the Inca Van. I'll get you the part number tomorrow... Quote Link to comment Share on other sites More sharing options...
Adam R4 Posted April 15, 2011 Author Report Share Posted April 15, 2011 Im 99% certain that you can also get the same caps but with Seat centre badges, they were fitted to the Inca Van. I'll get you the part number tomorrow...That would be awesome if you could! Cheers. Quote Link to comment Share on other sites More sharing options...
Chrisbee Posted April 15, 2011 Report Share Posted April 15, 2011 cars looking nice mate, saw it over on passionford. Quote Link to comment Share on other sites More sharing options...
onkobonko Posted April 16, 2011 Report Share Posted April 16, 2011 That would be awesome if you could! Cheers.Okay, well Im 99% wrong! The inca van caps arnt one piece like I thought, they come as a seperate hub cap and stud caps. The hub caps part number is 6K0601171B (£3.83 each) and stud caps 324601173A01C (34p each). Quote Link to comment Share on other sites More sharing options...
Adam R4 Posted April 26, 2011 Author Report Share Posted April 26, 2011 A little update, re-painted my drums in a nice fresh silver!After;Im also awaiting the delivery of my lupo rear lights curtesy of brooksy23!Adam. Quote Link to comment Share on other sites More sharing options...
Adam R4 Posted May 4, 2011 Author Report Share Posted May 4, 2011 Got my Lupo rear lights in tonight!I got my dad to modify a standard lupo plug and wires. Simple spades on the end of the wires for a plug and play system.Got the O/S light in and wired up...Removed the N/S and gave it a clean like the otherside...Looks Muchos better now!!Next up a de-badge and when it properly becomes summer a de-wiper. Quote Link to comment Share on other sites More sharing options...
ben16v Posted May 4, 2011 Report Share Posted May 4, 2011 mate that rear end looks the same as mine lolone question, is the rhs reverse light a darker shade than the other? it is on mine and its bugging me - sorry if you havent noticed it Quote Link to comment Share on other sites More sharing options...
Adam R4 Posted May 4, 2011 Author Report Share Posted May 4, 2011 No, it looks the same shade to me. i noticed it when i took the photo and thought it may have just been the angles the photo is taken on?Just went out to check then lol. Quote Link to comment Share on other sites More sharing options...
ben16v Posted May 4, 2011 Report Share Posted May 4, 2011 (edited) look removed as i dont wanna clog ur thread Edited May 4, 2011 by ben16v Quote Link to comment Share on other sites More sharing options...
Adam R4 Posted May 4, 2011 Author Report Share Posted May 4, 2011 That is quite a noticable difference!Mine really dont look any different when your stood behind it! Quote Link to comment Share on other sites More sharing options...
Adam R4 Posted May 5, 2011 Author Report Share Posted May 5, 2011 De-badged at the back now. That wiper's coming off in summer too! Quote Link to comment Share on other sites More sharing options...
Brother_Will Posted May 6, 2011 Report Share Posted May 6, 2011 Looking good, i like that plug and play loom for the lights, you could probably make a nice little bit of extra dosh selling those, i know i would have had one. 1 Quote Link to comment Share on other sites More sharing options...
Adam R4 Posted May 6, 2011 Author Report Share Posted May 6, 2011 (edited) its just basically the plug and part of the loom cut from a lupo, spades and heat shrink on the end. Easier than having to re-wire the plug and connects easily to the wires that you need to take from each side. Edited May 7, 2011 by Adam R4 Quote Link to comment Share on other sites More sharing options...
Recommended Posts
Join the conversation
You can post now and register later. If you have an account, sign in now to post with your account.