

Kieranbolton
-
Posts
143 -
Joined
-
Last visited
Content Type
Profiles
Forums
Calendar
Everything posted by Kieranbolton
-
now on ebay Sad times http://www.ebay.co.uk/itm/181034324308?ssPageName=STRK:MESELX:IT&_trksid=p3984.m1555.l2649 Kieran
-
following most people on here now No one is following back though! lol
-
Yeah the miles isn't going up either :/
-
Good morning on the way to work this morning my speedo died, checked all the fuses to no avail everything is as normal, (unless im checking the wrong fuse) Anyway has anyone came accross this before? Ive known cars blow fuses but the whole dash has gone out, not just 1/2 of it? Picture below shows what i mean, any help would be appreciated... Cheers Kieran
-
The fogs are great I love them Really happy how they turned out On another note, 2.0L ABF engine. Would that fit in the lupo?
-
Right now back on with it Lupo looked abit sorry for herself Finished the smoothing this weekend, then going to get it painted Luckely though got my foglights fitted Kieran
-
Fitted the HID's into the fogs and bought myself another servicing kit..... yep, the old girl is necking onto 150k Also ripped the front bumper off... foggys all ready to go Cheers Kieran
-
Good afternoon I carnt really comment on boot builds as im in the same boat as you at the minute ( Just sub and amp) until after the winter However upfront ive got Focal Access 165's Teamed with a Pioneer 6400BT headunit The speakers come out really easy Youll need a drill and some clips i should think First off the lower door card will come off by unscrewing the 5?ish bolts on the bottom, this loosens the bottom, then prise it off, No doubt youll break a clip or two, so probley best to grab some extra from VW, or space the current ones out abit further until you get some more. Once the door cards off youll see a little clip on the top, Chances are your new speakers wont be compatable with the clip so best cutting that off and attaching Spade connectors on the end Then you need to drill out the 4 rivvets holding the current speaker in place Then its time to fit the new speakers, Watch out for clearance on the window, id wind the window all the way around and try to seat the speaker in the hole, if it fits then great however if it doesnt then youll need some speaker rings. After the new speakers are securily fitted, then youll need to start sound deading things if your finding things vibrate, to be honest, id do it anyway, if you want to get into ICE then its definatly worth it Dynomat and the likes can be your friend here.... Let us know how you get on Kieran
-
you have a Forrest in your boot..... I like
-
1L Petrol Lupo power problems in the rain!?
Kieranbolton replied to LHyatt's topic in Volkswagen Lupo
isit not a cracked dizzy cap/ faulty dizzzy? Kieran -
This could've been chris pal's
-
Thankyou for the great replies Without sounding like a "ner ner na ner ner" The back has been completly cut out which allowed me to seat the indicator panel whereever i want it too (Hence the ductape) I then plastic welded the back which has kept some flexibility in the bumper, then skim filled over it, I actually ran a test on the bumper and indicator panel by prising them apart and i probley got a good 30 degrees in seperation before i saw a crack Anyway time will tell, Id like to hope that i would snap the indicator panel before i cracked the filler Thankyou for the feed back On another front, My Clutch died recently whist i thought it was the pedal box, it turns out it was the clutch cable which ive now fitted, Also whilst i was on ordered the Foglights for the front end too Kind regards Kieran
-
Just a quick update Passed its MOT with just an advisory on the near side wheel baring, So after too'ing and fro'ing i managed to get the hub off (the trackrod ends were seized on) However bought 2 trackrod ends so i guess ill do the other side next time i take the wheel off.... anyway... It was plain sailing for a week or so after that, I had her slammed again etc and then on the way to work yesterday, BAM Snap, Pedal box.... So this week will be spent stripping it out and getting the pedal box out For now here's a couple of photo's Front end getting there slowly.... Ill grab some more pictures of this tonight, Becuase it really does look better Thanks for reading Kieran Ps : Sly rear bumper shot!
-
Nothing like a good parmo
-
I have a cook book in the house.... Its filled with leaflets for many takeaways in the local area, when i say local... its usually no more than a 2 mile radius
-
sooo.... Work in progress yo! i kinda needed my car so i just put it all back together Tracking needs doing, 2 new tyres on the retro stars and an MOT this month Kieran
-
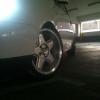
Good evening all, Just noticed this tonight, I was wondering why it wasnt scrubbing the tyres on my side of the car, but the passenger side always caught Anyway, Took the wheel off yesterday, thought nothing off it, Anyway taking my helpers out tonight and i noticed this : Now i assume i need to adjust the caster? How can i do this? Many thanks Kieran
-
Yep, Front bumper is being smoothed this weekend, Then painted next weekend, Dont get me wrong its not a Bodyshop finish..... But its not a bodyshop car Its mine Kieran
-
Lovely lupo mate Glad to see another white one popping up
-
can you not find some like bed covers or something? Bulk buy those? I dont know ?
-
Interior looks sweeeeet mate I should do mine really Mines looking poor lol
-
Right then, im quite possibly the worst person for updating a thread? And i have blown the dust off this thread... anyway.... updates ? Soon after those rolling shots were taken, i decided the modern lines just wernt me Ended up selling them due to all kinds of things like rubbing etc... anyway bought these instead : RH Cups Whilst i was now happy with how it looked i then moved onto ICE purchasing these : Pioneer 6400BT - Great head unit I teamed it with some Focal Access 165's Then got a Kenwood Sub (600W) - The sound quality is amazing I then got bored for a while and sold the cups on and ran around on my sport alloys Took it for a Pre-MOT and it needed a bottom arm, and CV boot, However i had an EPC light come on every now and again, So replaced the HT leads too, And the Fan temperature switch Then a couple of weeks ago i managed to grab these for a bargin, And some other bits and bats This is : Rear bumper, Front bumper, Drivers side rear light, Passenger door and Mirror, (Forsale) I Then set about smoothing the rear bumper off, This was hard but managed it in the end While this was going on i managed to get my hands on some nice Retrostar's Andddddd Your now upto date.... Just the other day i finished the bumper off and gave it a test fit before paint Thats all for now folks
-
Have ago yourself at smoothing mate I did my rear and it turned out pretty well
-
Looks great so far How much some sport alloys and some coilovers can totally transform a car
-
Cheers mate your a diamond
