Trx 33 Posted January 13, 2014 Report Share Posted January 13, 2014 After searching long and hard for information about this i have found surprisingly little, so here it is - Front fogs how to.Depending on what car you have this list will vary slightly. This how to was based on a Mk1 ArosaItem listMk2 Arosa specific:Fog light grill left - 6H0853665BFog light grill right - 6H0853666B2 Pull interior light switch - 6H0941531EMk1 Arosa specific:Front bumper lower valance - 6H0805903A2 Pull interior light switch - 6K2941531TLupo specific:Front bumper lower valance - 6H0805903A 2 Pull interior light switch - 1C0941531A(The lower bumper is interchangeable between both the Lupo and the Mk1 Arosa, i have listed part numbers separately as some Arosa exterior plastic is not actually black, it is 'neptune grey', so be aware of this when purchasing second hand.)Universal parts:Fog light left - 6H0941699AFog light right - 6H0941700AFog light loom - KufatecCable ties - TiesCable tie bases - BasesOr alternatively:Reel of wire - Your colour choice 1Reel of wire - Your colour choice 2Ring terminal crimp connector - Ring terminalFemale terminal block crimp connector - Terminal connectorLoom tape - TapeFog connector housing - 1J0973702Now that thats dealt with - Business time!If you want perfect fitment and have plenty of time on your hands you can make your own loom up and route it how you like but for ease you can use the pre-made loom i have linked.If however you want to make your own loom you need to twin the negative of each fog connector and send them to earth, then twin the positives and take the remaining wire through into the cabin.When i got the loom it looked like this:When you have the pre-made loom, all you have to do is route it neatly around the engine and plug it into the fuse board, its that simple. Arguably the hardest part of this is whole install is choosing a neat route to fit the loom.Step 1:Mk2 Arosa:Fit the fog lights and grills - This should be as simple as removing the old blanks and fitting the new fogs and grills. Step 1 done.Mk1 Arosa & Lupo:Remove front bumper - As there is a guide already online i will not go into to much detail on this.Remove the screws in the arch lining for the front bumperPop bonnet and remove all visible screws connecting the bumper to the body, it should slide off. If it does not, thoroughly check for any remaining screws.Honestly if you cant remove or figure out how to remove the bumper then you should not really be attempting this retrofit as it includes a lot of disassembly of trim and panels.Once the bumper is removed you can split the lower from the upper half, this is done by simply pushing the lock tabs out.The new lower bumper with the fogs pre-fitted (i emphasise this as it is miles easier to fit the fogs while off the car) should be snapped into place of the old one.Once this is done the bumper can be re-fitted.Step 2:Route the loom:The way i routed the loom was first to plug the fog connectors into the fogs. I plugged the long cable into the passenger side and the short into the drivers, i ran the ground up the drivers side along the loom and into the plenum chamber where there is a ground point just in front of the ECU. The terminal connector wire should split off around the drivers shock tower, this should be routed along the brake lines on the firewall and through the grommet commonly used for audio installs.The little white nub is the dome nut which secures the ground to the car, this is awkward to get to as it is under the scuttle panel and you cant fit a ratchet in, i used a 10mm swan neck to crack it then it spun off with a socket and my fingers. Slot the ring terminal through the basket and onto the shaft then lock the nut back up.The length of loom for the passenger fog was routed along the lower lip of the bumper underneath the fan. The loom should be secured down to the bumper with cable ties and bases to avoid unwanted movement and snagging.Step 3:(Bare in mind this was installed on a Mk1 so i can not advise how to proceed with a Mk2 or Lupo although the process should be similar once trim is removed)Mk1 Arosa:Remove the glove box and all lower dash underneath the steering wheel around the fuse box.Mk2 Arosa & Lupo:Remove relevant dash and trim to gain access to the firewall insulation behind the grommet.Remove relevant dash and trim under steering wheel to gain access to fuse box and relay panel.Interior wiring:Tape the terminal connector to protect it from damage when feeding around the cabin.Feed the wire through the grommet until you can grab it on the cabin side and pull it through and take up the slackGetting the wire to the other side of the car is the tricky bit but can be made a lot easier by the use of a stiff piece of wire, tape the end of the wire to the stiff piece and push the assembly along the loom or through a safe route to the drivers side.Once this is through to the other side, remove the fuse box, push it out of the way and you should be face to face with the white relay panel. The relay panel has 6 multiple coloured connectors, the one you want is the black one.Insert a small screwdriver into the tabs either side of the block, whilst pulling on the connector and it should come free.Pin 8 should be blank on the female side but the male side should magically have a pin in it.Route the wire safely across the pedal box enduring that is is impossible for any fouling to occur and zip tie securely.Push the wire into the back of the block and re-assemble the connector.Step 4:Install the switch:Mk1 Arosa:Remove the drivers side tweeter grill, pod and disconnect it.If you have bought the 2 pull switch for front fogs then you would see that there is a sprung tab on the bottom, this is the tab that needs to be depressed to release the bottom of the switch and subsequently pull the switch out of the dash.Feel around through the tweeter hole until you have found the tab, alternatively you can go in through the bottom, this is up to you, whatever is more comfortable and accessible.Once the switch is out, unplug the connector and fit the new switch.Mk2 Arosa & Lupo:Push the headlight switch in and twist anticlockwise, the switch should release and you can then remove it.Replace the switch with the new 2 pull fog switch.CongratulationsYou've got fogs.Use them wisely. 1 Link to comment Share on other sites More sharing options...
GeoffD Posted January 14, 2014 Report Share Posted January 14, 2014 cracking job, mate, you don't work for Haynes do you? ha ha geoff Link to comment Share on other sites More sharing options...
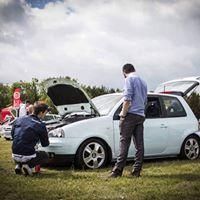
Trx 33 Posted January 15, 2014 Author Report Share Posted January 15, 2014 A little proof they work. Link to comment Share on other sites More sharing options...
Trx 33 Posted January 16, 2014 Author Report Share Posted January 16, 2014 If a mod could move this to the how to section that would be appreciated Link to comment Share on other sites More sharing options...
jon_273 Posted January 18, 2014 Report Share Posted January 18, 2014 I wonder if all Lupo's and Arosas can be retro fitted in this way. I didn't it was almost plug and play. Good how-to. Link to comment Share on other sites More sharing options...
Trx 33 Posted January 21, 2014 Author Report Share Posted January 21, 2014 I'm sure they could all be fitted this way, all of the earthing points are the same and it doesn't matter where it goes through the firewall as long as it goes through safely (existing grommet or purpose fitted grommet). The only way to know for sure is to check the connection on the relay board which is a 10 minute job.The GTI should be able to be fitted this way as long as you are prepared to make the lights fit into the grill somehow. If i was going to attempt this i would try using Mk2 Arosa fog lights and grills but this is just on speculation as i have yet to se a GTI up close.Something i noticed while fitting these was on either side of the connector, there was a painted white dash above the fog light pin slot. I'm assuming this was from the factory during quality inspection when checking if the right loom(s) had been fitted. This may be just on my car but if not, it is another way to identify the slot. Link to comment Share on other sites More sharing options...
Trx 33 Posted March 6, 2014 Author Report Share Posted March 6, 2014 I should probably give some credit and thank mattarosa for some little chunklets information when i was starting this Link to comment Share on other sites More sharing options...
Skezza Posted March 6, 2014 Report Share Posted March 6, 2014 Need get this in the how to section really. Link to comment Share on other sites More sharing options...
Recommended Posts