FraH2o
-
Posts
148 -
Joined
-
Last visited
-
Days Won
11


FraH2o's Achievements
")


-
And some pics of her post cure..... got to this point and after 1 year and a 1/2 of work , now I'm testing it, let's get to know each other, I'm waiting for the future torubles that will come out. Then I'll start thinking about future updates.
-
Once this first big step is done, I made some comparative pics of after and before. After 600 km apart from a intital problem (solved) on a brake caliper, everything seems to work and stay in place
-
Here Tchouki https://www.piastraparamotore.com/piastra-paramotore-di-acciaio-volkswagen-lupo
-
It's arrived the sump saver before doing any damage The fitting is quite easy and fits good There's too much clearence between the sump and the sump saver, but consequently the sump saver is very low, I have to work on the tolerances and rework the shapes of the plate itself otherwise I'll grind everywhere ... Positive note: it has an oil change window..... positive if it had a normal height. I'm afraid the head of the bolt holding the flap will wear off in 10km THis week i'll rework the sump saver to find a better match
-
It's a verry pretty ass!😇
-
I continue with some missing details and before a few complete and clean ride photos I reassembled the roof profiles converted from yellow to black paint…which looks much better in the original color version imho. And finally the wheel alignment
-
Many tahnks Tchouki...i always foolow your (very smart and interesting progress). The alignment of grill was ever a trouble to solve for me, and magnets seems works good.
-
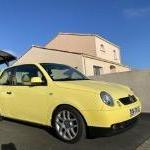
06/07/2023 Test Mot passed Tunsd to suitable daily use 😊 And first semi-official release Test and today then wheel aligment Photo taken by work matewho caught me in the parking lot
-
We are almost at finish line ... but at the review (MOT or TUV) it goes in beautiful granpa mode: 7cm higher, oem rims and oem headlights. But first I finished the woofer protection in the door And then at home the last part that separated me from the mot test: new windshield
-
While waiting for the woofer protections to finish the inside, I'm going on with something details to do (now there's little left). Cleaned both the parcel shelf and the headrest (which I will mount only the front ones) A few pieces to refresh with matt black - Battery upper bracket - Wiper arms Usual method: sanding, primer, 3 coats of matt black and final matt clear Another small mod to continue the yellow-black combo (also the yellow is quite ruined): the roof-side strips. Sanded with 400 and then invented a support for painting and these are ready to go back in position (just after replace the windshield)
-
Yesterday afternoon Iworked on right the corner of the bumper and I first tried to repair the missing tabs on the bumper with plastic welding A very complicated work without pliers and a hot air dryer with a nozzle. Difficult and high risk of further damaging the bumper. I started thinking about pairings and operting space inside the bumper and fender I disassembled the fixing bracket between the fender and bumper and I started thinking about how to fix it and make it solid and stable and at the same time functional for future disassembly. I fixed the problem by bolting the bracket to the bumper and bolted the whole assembly to the fender internally using flat head bolts. Internally I found enough space to tighten the 3 flanged bolts quite easily And with some satisfaction I had my desired result, and also the front grill was better repositioned Now with lines and couplings I'm almost at peace. The grille unfortunately has 2 clips broken of total 4 I'll see with 3d printer if I can redo the clips.
-
Nice tip Mk2 and thnaks, i'll do it today when a take out the front bumper. Next step are: complete the audio setup (still wait silicone speaker protection), replace the broken front glass, light adjustment and wheel alignment. I think a the end of July will be ready.
-
I have reached the first conclusive phase but it is not finished: well but not great. 🤦♂️ Glass half full and half empty. Half full: As a global vision I have achieved the result that I had set for myself and in the photos always seems a little microcar ... live (which however fall on my flaws) it is quite pleasant and satisfying Half empty: Assembled the front and a series of troubles that ruin everything. The attachments on the right side of the bumper are fixed and need to be reviewed (I have the slots on the corner of the bumper itself broken) and the grille and bumper coupling which has two attachments gone and I need to study. I foresee plastic welding session. I booked windshield replacement at home, so I don't have to move it or leave it alone. Today I'm disassembling everything and I'm going to start the previous setup phase I made a video where you can see the functioning of the "Mini R53" mod but that cannot be posted here. i post at least with the parking light on And here the trouble to fix immediately ( i started today in the afternoon)
-
I continue with the the front. A trouble is the coupling of the mask on the side with the fender. Vw proposes the clips, that break one day and the next… so i try to found another way to solve this problem that ruins the whole line. I had been thinking for some time how to couple everything in a solid but not constrained way with the risk of breaking the clip or the mask itself. Neodymium magnets of 7kg each. After checking the various dimensions and thicknesses, I positioned the magnets and the result was very satisfactory in terms of tightness, coupling and the possibility of adjustments
-
I rewired everything without ruining the electrical system too much for the relocation of indicators and front parking light in the fog light pod. I didn't take any pictures... Except for the clean mask now about to go up Now begins a very delicate part that can decree a job well done or ****. The grille is a really pain to align both from the fender corners and with the bumper. I'm studying to make a monolith with the bumper and to fix the corners with neodymium magnets to adjust the joints well and to avoid its shitty clips that break one day and the next. This should be the last real big stumbling block to completing the toy....the rest is all detail and descent