
TomCanham
-
Posts
60 -
Joined
-
Last visited
Content Type
Profiles
Forums
Calendar
Everything posted by TomCanham
-

Tom's Soft Blue - Creamy BBS and Custom Springs!
TomCanham replied to TomCanham's topic in Member's Cars
Alright guys, Not done much to the car for quite some time now, Not even cleaned it since September! Although i'm now running some standard sport alloys on 155/55 nankangs for winter. Will be rebuilding the front BBS in the meantime as they are leaking. Can't wait for the nicer weather to come back around in the new year and crack on with this now Some pics of how she is currently looking -
Tom's Soft Blue - Creamy BBS and Custom Springs!
TomCanham replied to TomCanham's topic in Member's Cars
Hi mate, I payed £90 posted for the springs second hand off someone on the facebook page Not sure if this is a good price or not, I just wanted them haha -
Tom's Soft Blue - Creamy BBS and Custom Springs!
TomCanham replied to TomCanham's topic in Member's Cars
Thanks mate These turned up int the post yesterday, Some custom springs, rated up to 2 tonnes so they are rather stiff! Currently got it sitting a little lower at the back, Still got half an inch to wind down on the fronts, then i've got he helper spring to take out. How much different will that actually make?? Will get some pictures this weekend. Will be terrible though, as the car currently has standard wheels on the front as the BBS are leaking air and need re-sealing (Sorry, its just a crappy phone picture) -
Tom's Soft Blue - Creamy BBS and Custom Springs!
TomCanham replied to TomCanham's topic in Member's Cars
Not done so much to the car recently, Not since edition really. I've had the lower dash out again this week to sort out some wiring, So while it was out I wired in an amp so I can put my sub in and fitted the heater control dials from an Arosa as I think they look a lot smarter. Only got a picture of the controls Who wants to see an small amp amp anyway. Then today, I finally got round to fitting the lower front bumper with fogs i've had sitting around in my garage for months. Great improvement to the car I feel and I should of done it a lot sooner. They aren't wired in at the minute though. Not sure whether to wire them in as actual fogs or turn them into either a second set of indicators or a second set of side lights. I've now also started the stockpile of parts for the next big thing to come, so watch this space, Though I think it will be some time as I get the bits together and get handy with grinding and welding... -
Tom's Soft Blue - Creamy BBS and Custom Springs!
TomCanham replied to TomCanham's topic in Member's Cars
Just a few from Edition38 -- Was my first time going this year, Camped there from the Friday night. Was blown away by the class and quality of the cars that were on show! Really enjoyed the weekend and will be there next year for sure! Really really love the wheels, So glad they have turned out great! Actually loving the cream with the blue of the car (I was rather worried that it wouldn't look right). I've also had many a compliment on the wheels from many family and friends and I feel that's made them worth it and put a big smile on my face! Just don't overly like the way they are sitting at the minute. I am able to get the car sitting on the floor practically at the rear, But like said in a few posts back, the tyres were just sitting on the arches and liners, So im going to have a look at modifying the liners and a bit more camber I think. Due to it sitting on the tyre, I ran the standard ProSport coillie springs without the adjusters for edition but this has allowed the very edge of the tyre just to catch on the inner arch despite them being rolled, So I think the plan is going to be to have some smaller much stiffer custom springs made up from Demon Tweeks I think and have a bit more work done on the arches where they have been rolled. Also think my gearbox is about to go :'( - Its showing a few signs, Will just have to see how that goes.... Thanks -
Tom's Soft Blue - Creamy BBS and Custom Springs!
TomCanham replied to TomCanham's topic in Member's Cars
Thanks man, Will definitely see you around! Where about are you from exactly? Ive seen one or two red Lupo's around the Loughborough area. Fair enough man, Great price on the sport wheels! Ive been running them too for the last few weeks. Think they look really cool. Got round to fitting the tyres and wheels today. Went for 165/55's all round. Took me a while to find somewhere that would stretch the rears on for me! I don't really have many pictures, But I have a setup for the rear suspension I was planning on using that pretty much got the car on the floor (even the standard sport wheels just sat on the arch liners) and the rear fitment was great!! Really makes me wish I had air haha. So for now Ive put the standard ProSport springs back in without the adjusters and added some camber using the washer trick but I didn't get any pictures as I just wanted to drive!! I'm planning on fiddling around with the rear fitment tomorrow to see if I can get them sitting any better before edition then just give it a good clean. Pics will come tomorrow I guess -
Tom's Soft Blue - Creamy BBS and Custom Springs!
TomCanham replied to TomCanham's topic in Member's Cars
Ill probably be looking for about £230 for the steels as the fronts aren't 4x100 fitment so they come with adapters (why the fronts poke so much). The rears aren't the right center bore either and I don't have spigots for them. Small world man! So, I got the centers back from paint, They're alright, But i'm going to be keeping my seeing spheres peeled for some chrome centers! Also really annoyed that my new logo caps wont be here in time for Edition as these now let the wheels down. Hoping to get the tyres on first thing in the morning so I can madly rush with sorting camber/fitment! -
Tom's Soft Blue - Creamy BBS and Custom Springs!
TomCanham replied to TomCanham's topic in Member's Cars
Cool, Might see you around at somepoint then at some of the meets then. Some one in my family bought the black one off me so I still get to see it around, even if it is back to standard The bandeds are sitting in my garage doing nothing now. Probably going to be up for sale once the BBS are on. Thanks man! Thanks man, I've put a more money into them than initially planned, But they have turned out far better than I imagined they would. I've fallen in love with them too -
Tom's Soft Blue - Creamy BBS and Custom Springs!
TomCanham replied to TomCanham's topic in Member's Cars
Alright guys, Not much been happening with the actual car apart from having the arches rolled the weekend just gone.. But I now have a new set of wheels! I bought an old set of BBS RM's that were pretty dire, The dishes were proper had it and the paint was all chipping off, But I got them at a really good price! This is how they were when I picked them up, 15 x 6.5j Bought them about a month and a half ago now and since then have been accumulating new parts for them. I got them back from the powder coaters today and built up one of the rears straight away. I bought some standard 0.5" lips from a mate for the fronts and some 2" lips for the rears making them a staggered 15 x 6.5j & 8j. Also picked up a set of gold bolts and had the centers done in Creamy White / Ivory. Still need to get the center caps painted yet, But im hoping to get them ready for edition now, But that's getting rather close! Here are some pictures! That's all for now! Thanks for looking -
Tom's Soft Blue - Creamy BBS and Custom Springs!
TomCanham replied to TomCanham's topic in Member's Cars
Its just a Mountney boss for a Mk2 golf from VW Heritage -
Tom's Soft Blue - Creamy BBS and Custom Springs!
TomCanham replied to TomCanham's topic in Member's Cars
Alright chaps, Not sure anyone's interesterd, but here goes haha Been a while, There's been a few changes to the car, But its going a bit slow at the minute as I don't have the need to drive the car much as I get lifts to a from work, But here is whats happened over the last few months. Recently got round to fitting a rear Sharan badge as I think the standard one is far too mahooosive! Once I got that on the car, I got round to giving it a quick wash as she was filthy and she turned out alright for a quick once over A few weeks back I made a 6 hour round trip to get some new front seats that came up at a bargain price! Drove from Leicester to Bristol and back for some Full leather Mk4 golf v5 seats and I couldn't be happier! They are so comfy! Once I ground the bases down they sat in the rails perfectly! (In the pictures it looks as though the leather has some odd lumps in it, but they aren't there in person) And after some ballache with the steering column adapter I managed to fit a super tiny Mountney GT 11" steering wheel and its changed the car unbelievably for the better! Some of the interiour trim is missing in the above images as they are off for paint I've also changed all light grey plastics for black ones. The only ones I didn't have were the upper doorcards so i'm on the lookout for some of them. I also am desperate to get these bandeds off and the car lowered more. I an 80% through refurbing the Atiwe allows, just need the centers painting, But i've put them on hold as I'm currently planning something big, So watch this space! Tom -
Give this a read mate, Should explain it. http://www.forum.dirtystancing.com/viewtopic.php?f=14&t=43
-
Hey guys, Hope you are all well Tried removing the headlight surround today so I could change the headlights, but the small white clips at the far ends snapped (as seen in the picture below) Just wondering where I might be able to get some spare / replacement clips from and if anyone could point me in the right direction please And while we are here, Could someone please explain the correct method of removing this headlight surround / grill trim please? Just so I dont snap bits up next time, Would be much appreciated! Many Thanks
-
Thanks for that mate, I got fed up waiting around for someone to answer as im so impatient haha, I went ahead and ordered that mk2 boss! Good to kmow I made the right choice
-
Alright guys, Just looking for some help / advice on fitting a Mountney traditional wheel, Any help will me massively appreciated! Right, I've bought a traditional Mountney GT steering wheel. The wheel wont fit onto a Momo boss as the PCD is a lot bigger and Mountney don't make a boss that fits straight onto a Lupo. I was looking at the traditional boss here (for a Mk2 Golf) and I noticed that in the description that is says that with the removal of the spline adapter, the boss could fit on later models of the golf. Now i've read that some of the later models of golf wheels will fit in the Lupo with slight modification to the slip ring. Am I right in thinking that if the boss fits later golfs and later golf wheels fit the Lupo, Does that mean the boss could fit in the Lupo with a bit of work? Or is it not that simple and its going to be loads of work? Thanks Heres a poor quality picture of the wheel
-
Tom's Soft Blue - Creamy BBS and Custom Springs!
TomCanham replied to TomCanham's topic in Member's Cars
Cheers man, I think the bandeds are 13x7 fronts and 13x8 rears -
Tom's Soft Blue - Creamy BBS and Custom Springs!
TomCanham replied to TomCanham's topic in Member's Cars
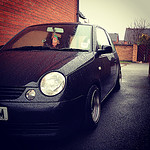
Soooo the 1L is slighty old news now. I was having doubts about keeping it, But i wasn't sure I wanted to let go just yet as I love the feel of the Lupo. Then this came up at the right price, So ive bought a soft blue 1.5 16v from a mate. The car has a 4-2-1 manifold with a decat and a Pipercross induction kit, Its lowered on ProSport coilovers and sitting on Banded Steels. Not even had it a week yet, Cant believe how much quicker it is than the 1L, Been a few times ive not realised what speed ive been going! Not done much to it myself yet, Just fitted my headunit, roofbars, LED sidelights and the silver front badge. Ill let the picture do the rest of the talking. I don't like the way the steels are sitting on the front or the rear, but the rear more so, poke far too much. I'm currently refurbing the Atiwes at the minute, so hopefully I can get them on soon as. Thanks -
Just been out an had another look. Turns out the wire going into the bulb was an adapter of sorts, so I just took that out and switch over the holders from my older Lupo, Pretty simple in the end, and Saved me some money as well Cheers anyway mate!
-
Evening all, Ive got a numberplate bulb out and as ive come to swap them over from my other Lupo i've found out that they are not the same. So could anyone inform me on what type / style bulbs these are and point me in the direction of some decent LED ones for sale Many Thanks!
-
Tom's Soft Blue - Creamy BBS and Custom Springs!
TomCanham replied to TomCanham's topic in Member's Cars
Car is back on the standard wheels for now, Going to get my ass into gear and get the Atiwe's refurbed for some of the shows this year. Also decided on keeping the car, got some big plans if I can get the wonga together! -
Tom's Soft Blue - Creamy BBS and Custom Springs!
TomCanham replied to TomCanham's topic in Member's Cars
Alright guys, Not much has happened recently as I sort of lost interest. Gave the car its first wash in 2 months(ish) on Sunday using my mates snow foam. The front bumper went on the car, for it to crack straight away and one of the clips holing it in at the side snapped. So its currently not clipped in on ones side. Ill get around to it in the next few weeks. Planning on sanding it all back and starting again with the smoothing and getting the wheels refurbed again ASAP as ive proper neglected them. Here are some pictures from a local get together from the weekend. I have thought about selling up for something a bit more modern, I've been thinking up some plans and i'm swaying towards keeping it. Will have to see what the future holds. -
Thanks for the reply, Didn't see it before I attempted it though :S The front end comes off a lot easier than I expected though! Whipped it off in about 30 mins with a mate and that was without looking at anything information wise online.
-
Alright guys, I've done some searching and couldn't really come up with anything useful. Tomorrow i'm going to attempt to fit a new bumper to the car and I have no clue on how to remove the current one that is on the car, I'm going in blind. I would appreciate any tips / information on how to tackle it, where to start and where the screws and clips are located etc... I apologise if there is a blindingly obvious thread for this already Thanks
-
Tom's Soft Blue - Creamy BBS and Custom Springs!
TomCanham replied to TomCanham's topic in Member's Cars
Well, I finally got my bumper back from being sprayed (Took so long as it was a job on the side from one of my grandad's mates and he was very busy) Pretty chuffed with how it turned out in the end and I cant wait to get in on the car! Probably will be a while till its on yet as im pretty busy for the next week or so, But this is the outcome: My grandad also picked my up some Thule roofbars for the bargain price of £8!! Though he didn't realise they are for a Jetta, so I am going to see if there is any way I can modify them to fit onto the Loop! -
Tom's Soft Blue - Creamy BBS and Custom Springs!
TomCanham replied to TomCanham's topic in Member's Cars
So then, I spent last weekend having a go at smoothing my bumper with the help from a mate or two and my grandad! I bought a new bumper off eBay to save me having to remove mine and take the car off the road while doing it. Once that arrived we drilled some hole into the plate recess for the fiberglass resin to sort of go through to give it some extra hold. Once the holes had been drilled we added a few layers of fiberglass and left it over night to dry (took ages as the weather was too cold). The next day we drilled in several self taping screws to make sure the fiberglass had something solid to bond to and set about building up the layers of fiber glass trying to get it to match close as I possibly could to the natural shape of the bumper. It ended up looking like this: So the fiberglass was built up as close as possible to the shape of the bumper. This left some of the fiberglass over the edges and pretty rough around the edge, So we took a drill with a flapper wheel and began smoothing and leveling the edges as best as possible. Once it was all smooth and level-ish around the edges the filler-ing started: Had to have a mid bodywork snack!! Once all the filling and snacking had been done. We then thoroughly checked over it again and again to find any high and low spots in the filler that needed sorting out. These were circled in pencil and then either filled more or sanded down. Once all the high and low spots that we could feel were worked out and everything was sanded smooth and sanded more it was looking like this: Once we thought it was all smooth, we used some filler primer and coated the filler to see if we could find any imperfections that we missed. Turns out there was plenty of spots that were missed. So out came the filler and wet and dry to start working out the bad spots leaving this: Since that last picture was taken the bumper is now all primered up and ready for painting. Its going into my grandad's mate's body shop sometime mid-next week for a few coats of paint. Im pretty happy with how it came out actually,pretty please with myself and the people that were involved in the process. I don't think its gone too bad for a few people that haven't done anything like this before. Will update again next week once it has got some paint on it! Thanks
